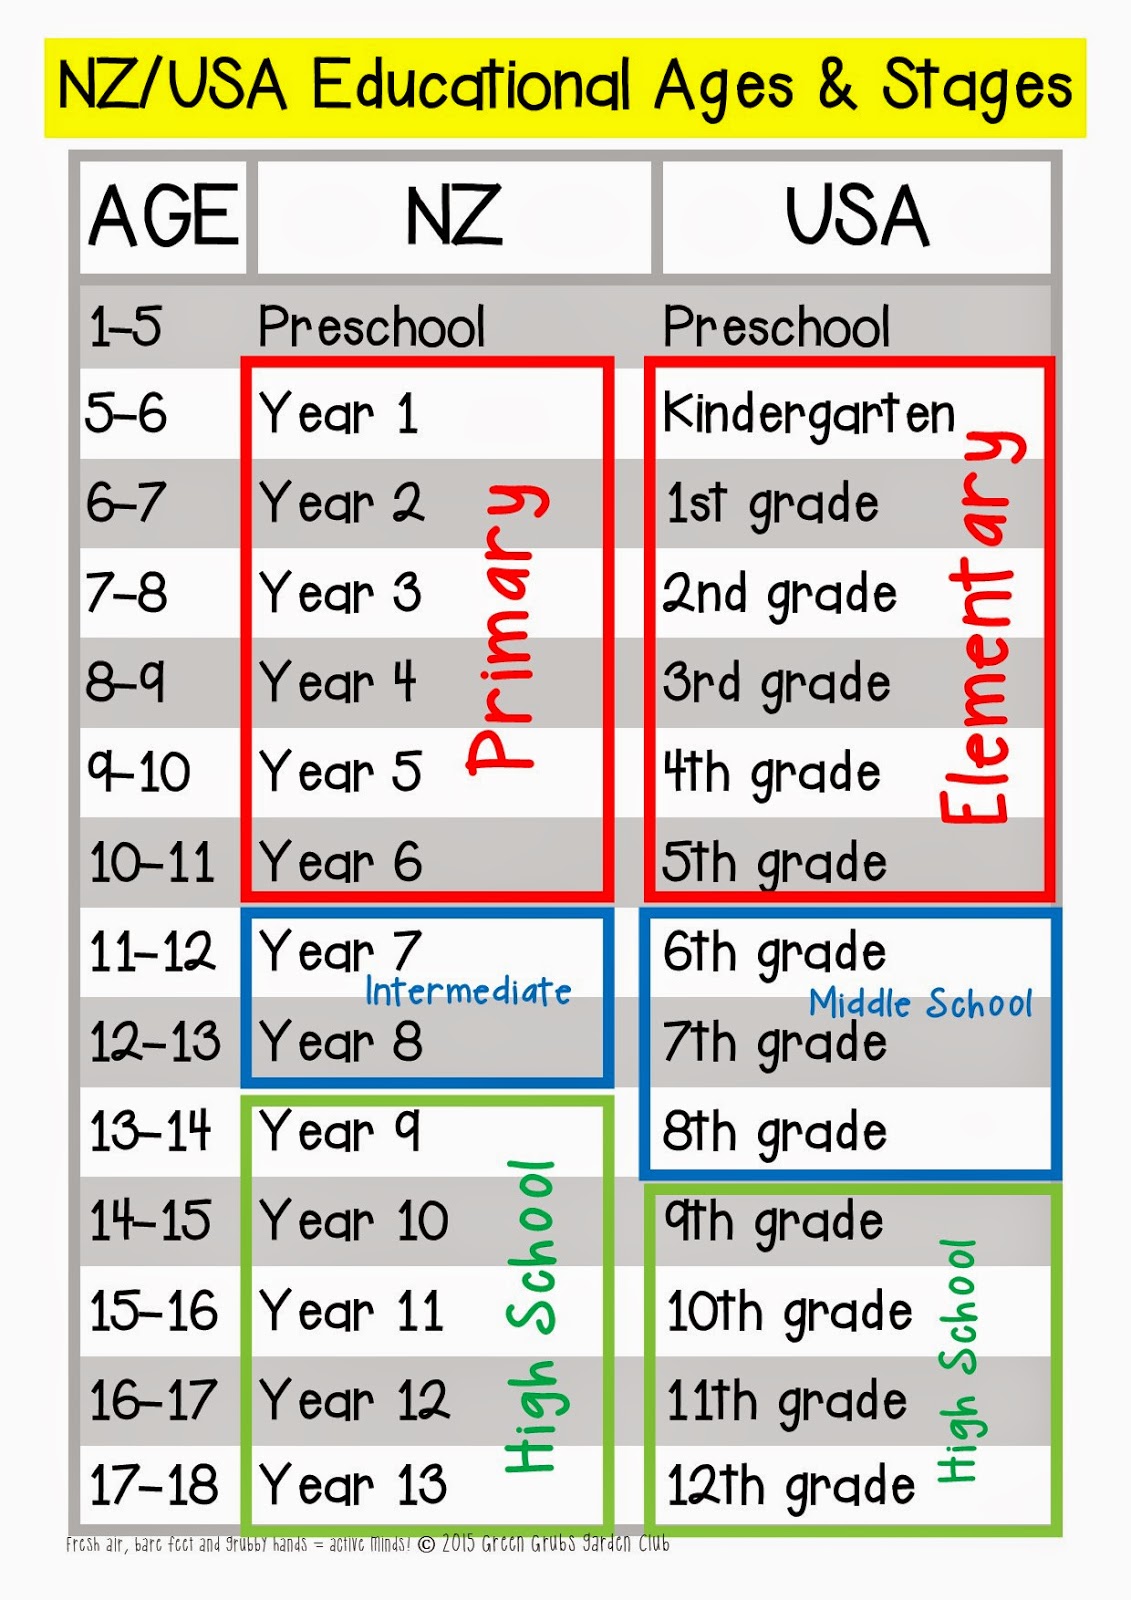
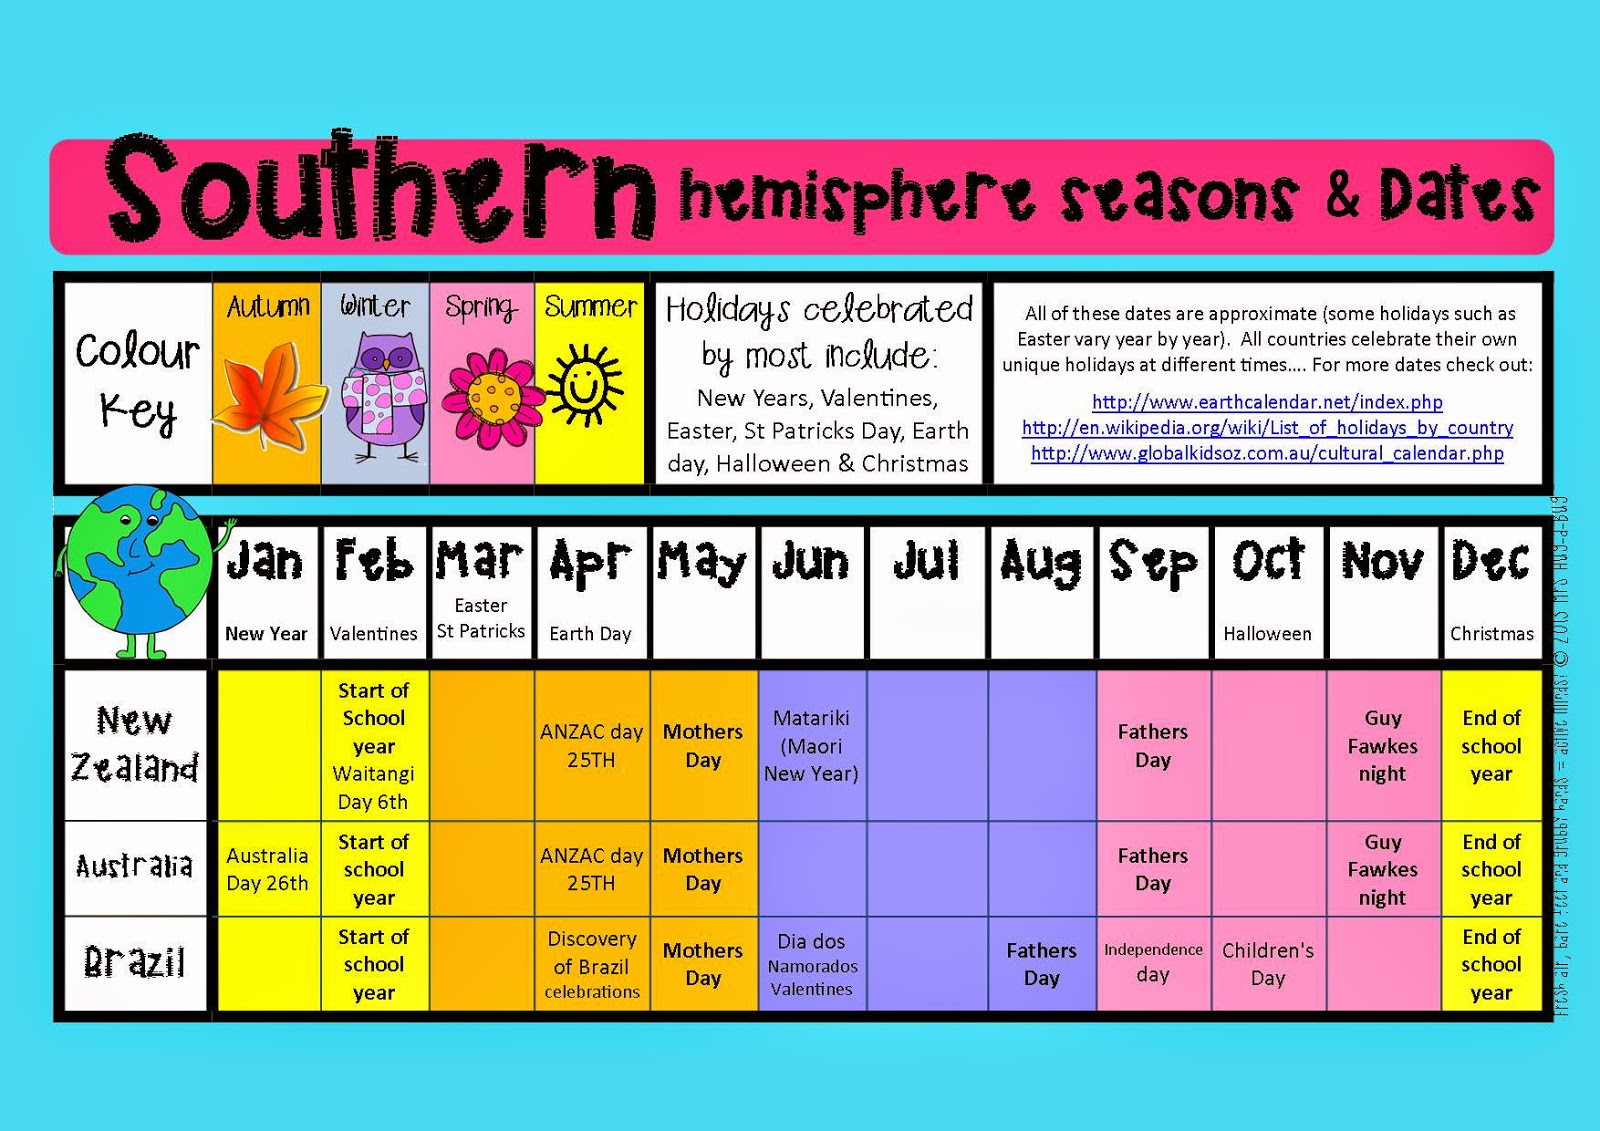
*Tips on creating awesome products, choosing the correct paper sizing, US spelling & imperial measurements, paying taxes, US grade levels vs NZ year levels, differences in school terms, holidays and seasons

If you’re reading this, you’re probably already familiar with the American ‘Teachers pay Teachers’ website – probably (as I was) because of the amazing amount of free items available! This free to join and rapidly expanding site is an ‘open market place’ for educators to buy and sell resources. Because it’s an open market place there are very few restrictions on what you can sell (as long as it’s teacher related and copyright infringement free). You can set your pricing as you choose, and the site takes a small proportion of money from every sale – If you’re serious about selling on TpT, I suggest you upgrade to premium membership ASAP… you can find more information on setting up an account and the levels of membership here.
Below are some tips for Kiwi sellers (or other sellers outside of the US) that I’ve found out the hard, sllooowwww and long way – please feel free to chime in with your own advice or tips below. I’ve only briefly touched on most points, but am happy to elaborate if you need more support – use the social media icons above to flick me an e-mail, ask in the comments section below or message me on facebook
- Add duplicate pages at the back of the document with the alternate spellings (in Publisher, click ‘insert duplicate page’ before changing the selected words) This is an excellent option for short documents, or resources with only a few alternate words to add).
- Create 2 completely separate files and zip them together before uploading.
- If your document is longer or contains many words (which is most of my products!) you can always offer (in your product description) the option of contacting you to discuss alternate spelling. I make use of the ‘ask a question’ section of my TpT store to do this – you can see an example of this here at the bottom of my product description under customer tips. In nearly 2 years of selling, I’ve only ever been contacted a handful of times to provide this option for someone. I feel it’s a thoughtful thing to include for your buyers, and provides one less barrier for potential customers who are considering buying from you! (I get my customers to purchase the product, then e-mail me with their user name so I can verify their purchase. I then e-mail the edited version straight out to them)
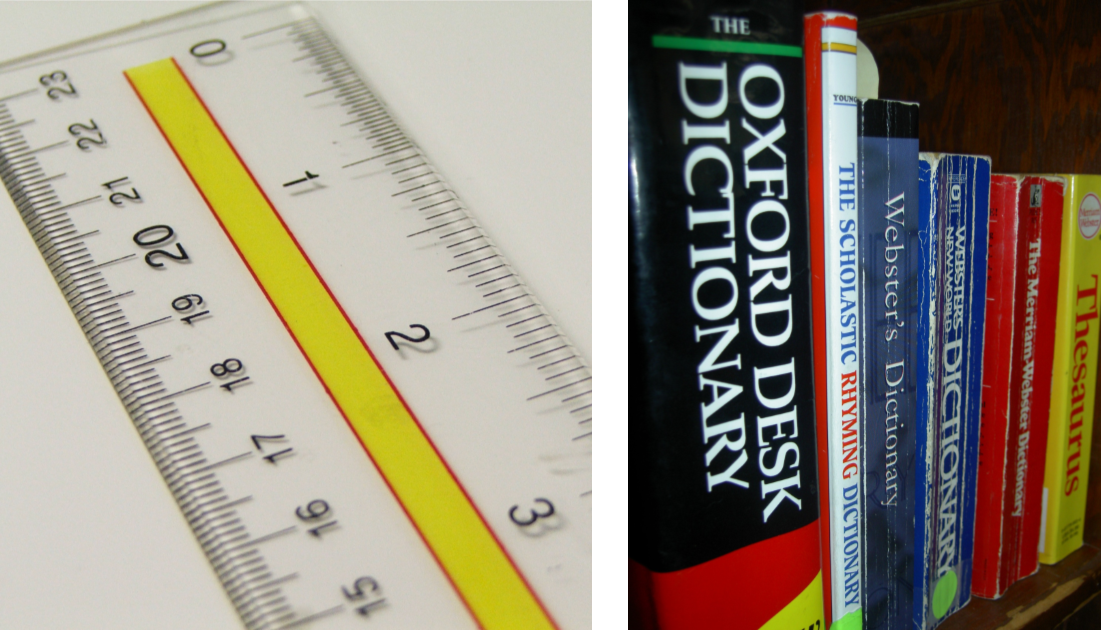
- The US (along with Venezuela, Chile, Brazil and very small handful of other countries) use a different paper sizing option to the rest of the world. This US paper sizing is not a logical system in the same way the A4 system is (e.g. two A4s = one A3; two A3s = one A2 etc.) their paper sizing is random, in that the sizes do not relate to each other.
- Basically ‘US letter’ size is SIMILAR to A4. ‘US legal’ is SIMILAR to A3.
- Products created in A4 can be printed in the US on US letter size paper, but the margins will be slightly off and it may crop out the top and bottom parts of the page. Similarly, we can easily print US letter size onto A4, but it may have extra large borders on the top and bottom.
- Printing in larger sizes (US legal) does not seem as common in the US as printing on A3 size does here, so I’ve avoided using larger paper sizing in products intended more for the US market. (*Read more about choosing the correct paper sizing for your market further down the post).
- You’ll need to go into your page design settings and choose the correct paper sizing for your needs when creating your product.
YOUR TARGET MARKET – WHICH TO CHOOSE?
- Some resources are a ‘no brainer’ (e.g. my NZ Waitangi Day and Anzac day products are created in A4 sizing as these are of no interest to the US market).
- If you’re targeting a broader market (e.g. my best selling ‘Worms’ product) you’ll need to consider how you want to handle the paper sizing and spelling issues.
IMPORTANT – it’s much easier to convert a product from US letter size to A4 than the other way round! (Changing from A4 to US letter size means you’ve got to squish a large amount into a smaller size which causes twice the re-sizing issues. Stretching your smaller US size to the larger A4 is easier. If you get desperate, you can always JPEG each page and the reinsert them into the new paper sized document, but the quality is never as good.
- Re-save the product and call it “_______A4 version” (or something similar).
- Click ‘page design’ and choose the new paper size.
- Go through each page individually, highlight all objects on the page (ctnl+A) and click ‘Group”.
- Carefully re size all the objects to fit the new page borders (pay careful attention to all the text boxes as you can sometimes lose the last lines of sentences and may need to un-group and re size the individual boxes).

The secret to having regular sales definitely starts with having appealing and unique resources! This topic could become an ongoing series of blog posts, so I’m going to keep this VERY brief…
- Most sellers make their products in Power Point or Publisher (I use Publisher, a few use Word, but most people swear by Power Point).
- You’ll want to make sure your product comes complete with a small copyright mark on each page and a ‘credits’ page that gives recognition to the clip art and fonts used. A page which includes links to your social media sites is also a good idea.
- Check out the sellers on TpT who create commercial licences for clip art and fonts – as you’re now selling and making a profit off products, the clip art and fonts you use need to have a commercial licence.
- Make sure you include a eye catching cover page, product preview, thumbnails, and a detailed product description.
- Your first product needs to be a freebie. This is great advertising for you and your store, so make it awesome! Have a look at some of the top sellers and download their freebies to get some more great ideas on all of this.
- For much more detailed information about hyper-linking product descriptions/adding fancy quotes banners/conversion rates/securing your products/product views on your store page etc. you’ll want to find the TpT sellers forum and peruse them daily!! (In the green bar at the top of the forum you’ll see a small ‘search’ icon – make use of this as every topic under the sun has been discussed multiples times here.
Making awesome products needs to be your number one priority, and most sellers talk about a tipping point in making sales that comes after having 20+ products in their store. This can take a long time….patience, patience, patience will be required on your TpT journey – I only started seeing regular daily sales 6 months in. As soon as you’re seeing interest in your products and sales, you’ll want to think about marketing. If you’re already on social media,you’ll probably want to consider setting up separate business pages (to both save your non-teacher friends from being spammed with resources, and because separate business pages are a requirement for most sites.) There are so many social media options out there that it can seem overwhelming. Here’s are my thoughts on a few! Choose one that you’re confident with and then SLOWLY build from there.
- PINTEREST – a business page is a must. This option is free and gets your resources in front of hundreds (if not thousands) of teachers eyes. You’ll want to join some good collaborative boards that focus on the curriculum area and year level range for your resources and make some eye catching ‘pins’. Check out my boards here and please let me know if you’d like to join my ‘Kiwi Education’ collaborative board.
- FACEBOOK – I have a dislike/hate relationship with facebook! You’ll need to set up a separate ‘business’ page for your store and be patient. The new business page algorithms now mean that not everyone who follows your page will see your posts (I have over 1000 followers, but unless I ‘BOOST’ (read PAY!) a post, on average, only 10-50 people will ever see it. I post regularly to facebook, but have found it really hard to grow a following there compared to other social media sites.
- INSTAGRAM – if you love taking pictures and/or your smartphone this is a great site for you! It’s a great way to connect with other teacher-authors from around the world and is much easier way to gain followers and build relationships.
- TWITTER – I’ve yet to fully embrace twitter, but some people love it. There are also awesome teacher chats to get involved with, discussing both local and overseas teaching issues.
- It’s best to think of social media as a ‘take-away’ meal – everybody prefers to order from different places, so the more different ways you have of offering your ‘meal’ to people the easier it is for people to connect with you and your resources. Some sites allow you to share posts to other sites (e.g. you can share your ‘tweets’ or instagram pictures to your facebook page if you so choose).
- BLOGGING – I have only recently started blogging, but have found it a great way to connect with other teachers overseas. I treat my blog as a ‘hub’ that all my other social media connects to. It’s a great way to give your resources some credibility, show them in action and let your customers get to know you.

I never paid much attention to the stock market section of the news before starting on TpT… currently, the US dollar converts really well in to Kiwi which is great for us! In trying to discover what form I should file last year, I had the funniest conversation with the call desk operator at IRD while trying to explain TpT…. I thought I did a pretty good job in educating her on the whole set up, and was put on hold while she added details to my file. After about 5 minutes she came back on the line and said “So, just to be clear, you ACTUALLY MAKE MONEY off this??” ha ha ha!
***DISCLAIMER! I am in no way a TAX or IRD expert – when in doubt, consult an accountant or ring IRD!
- The US and NZ have some type of reciprocal agreement that means we only have to pay tax off profits from TpT here in NZ.
- You’ll need to file a yearly IR3 form (Check YES to the question “Did you receive any money from overseas?”) You’ll need to enter the amount of profit made after deducting your expenses. I deduct things such as the clip art and fonts I’ve purchased to create my products, and some people deduct power, printer ink etc. TpT has the great advantage of being able to quickly see at a glance how much you’ve made between certain dates, so make the most of their graphs and stats to track your progress). Click here to find out more information about IR3 forms.
I’ve been delighted to see the number of Kiwi’s on TpT growing – please check out my list of other sellers here and let me know if I can add you to the list!

I hope this has been helpful – happy creating!
Grubbily yours,